|
EZ Emergency
Well Pump Kits. |
|
Pump Installation
Instructions |
|
Please Read
Carefully.. |
|
|
|
 Our kits
are really very easy
to assemble and
install.
If you can drill a
couple of holes and
glue PVC pipe
together...you can
easily install your
hand pump. Our kits
are really very easy
to assemble and
install.
If you can drill a
couple of holes and
glue PVC pipe
together...you can
easily install your
hand pump.
Once you have
everything laid out
on your lawn,
everything will come
together.
Just take it one
step at a time...
We
Offer Great Support
If You Need Help
Installing Your E-Z
Water Well Hand
Pump,
I'M
THERE FOR
YOU AT EVERY STEP, 6
Days A Week.
Phone John Tatman @
Cell#
1-409-554-3628
If You Have
Questions During
Assembly &
Installation - 9am
to 5pm Central Time,
Mon thru Sat. |
|
 |
|
|
|
IMPORTANT:
Do Not
Purchase Schedule
40
Pipe
For The 1" Outer
Casing Pipe...The
1/2" Pumping Pipe
Couplers Won't Fit
On The Inside Of A
1" Schedule 40 Pipe.
Here's What You
Need:
For
The Outer Casing
Pipe, You Need
1" Thin Wall
Pipe 200 psi
From
Lowes,
Home Depot or
Menards in
the Midwest, or your
local hardware
store.
Lowes
is your
best bet
to buy the 1" "Thin
Wall" 200 psi pipe
required for the
pump outer
casing...Lowes
stores stock it
nationwide, but call
before you make the
trip and ask for
Item #23993.
Charlotte
Pipe 1-in x 10-ft
200-PSI SDR 21 PVC
Pipe. To save
time, go to
your local Lowes
website and type in
Charlotte
Pipe 1-in x 10-ft
200 Psi Sdr 21 White
Sdr 21 PVC Pipe.
It'll tell you the
quantity in stock
and the aisle
number. If it's out
of stock, check
another Lowes, Home
Depot or Menards if
you're in the Mid
West.
![]()
In
the Midwest you can
try Menards,
you'll need 1" x 10'
Sdr. 21 Plain End
Pipe...Model
Number:
1x10sdr21PE
Ask For
SKU:
6899697![]()
At Home Depot
it's called 1 in. x
10 ft. Plastic Plain
End Pipe - 200 psi
Thin Wall.
For the inner
pumping pipe,
use
1/2" Schedule
40
in10' lengths. Always in stock
at most stores.
NOTE:
On VERY RARE
occasions, your
local Home Depot or
Lowes might be out
the 1" Thin Wall
pipe. Not To
Worry...our
Kit can easily
be adapted to use 1
1/4" Schedule 40
pipe. Call me about
this and I'll give
you easy
instructions,
If you have any
questions, give me a
call.
|
|
Go Ahead And Preview
This Page, But
Come Back To These
Links
To Get Started:
OTHER LINKS
#1
First, Build Your
Pump Handle
>>
#2
Then
Build Your Support
Unit At Your Well
Cap
>>
#3
Wooden Installation
Support Block
>>
#4
Detachable Pump
Handle Section
>>
Installing
In A Well House Or
Indoors/basement
>>
A
vast majority who
purchase our Pump
Kits simply store it
with all the piping,
fittings and PVC
Cement until it's
needed in an
emergency. If this
is your plan, I
suggest purchasing a
30 gallon potable
water drum and
siphon hose from
www.beprepared.com
and store water for
a short term
power outage. Then,
if needed you can
install your hand
pump for a long
term power
outage. (add a can
or two of PVC Cement
once a year and
store it indoors,
not in the garage
where it might dry
out) |
|
Please Note:
You may
detect a slight odor
of PVC cement when
you open your order.
Not to worry, this
is normal and will
eventually go away.
PVC cement is used
worldwide everyday
in water well
installations and
will not harm your
well water.
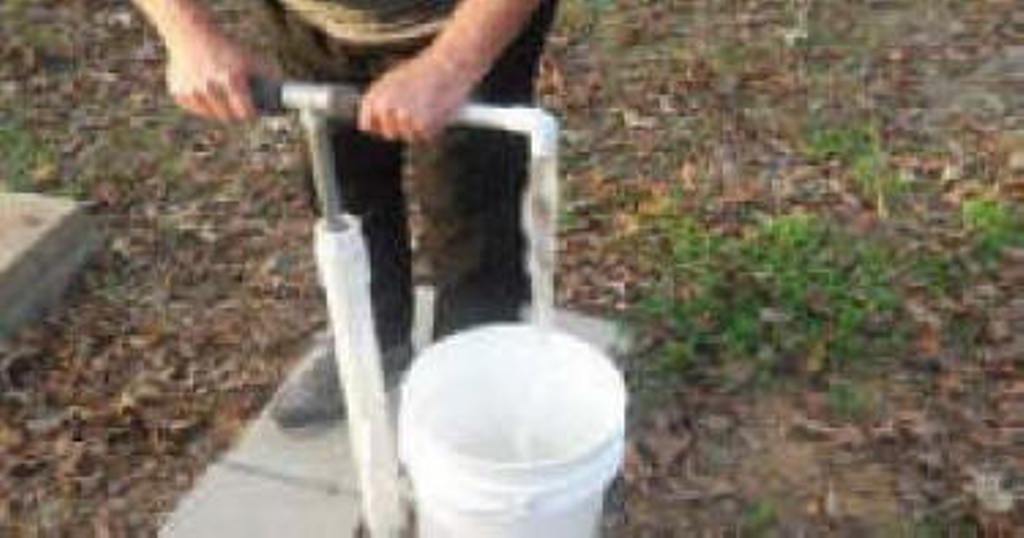
Test Your Pump
Piston:
All pistons are air
tested several times
during assembly,
however it's
advisable to test it
prior to
installation. It may
have been damaged
during shipment.
Simply test it by
pumping the 1/2"
pipe in a 5 gallon
bucket of water
filled to the top.
You'll be pleased
with its
performance. |
|
|
|
![]() |
|
|
|
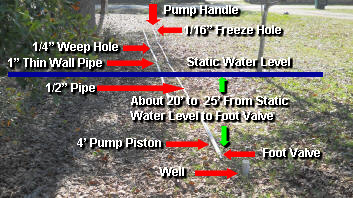
A Diagram Overview
Of How It Works
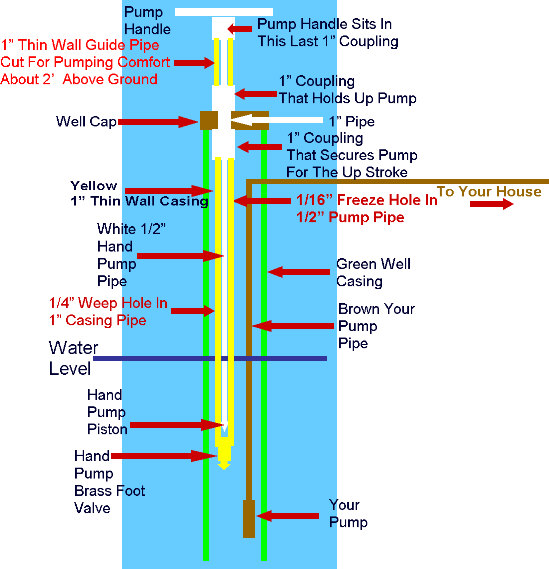
NOTE:
Regarding
Freeze Hole:
Once your pump is
built as per our
instructions, it
will have a
1/4"
weep hole on one
side of the
larger 1" Thin Wall
outer casing pipe
(pictured in yellow)
say 5'
or so above
your static water
level that drains
any seepage back
into your well. This
keeps the outer
casing free of water
below the freeze
line. The smaller ½”
pumping pipe
(pictured in white)
will have a 1/16”
hole drilled on
one side of the ½”
pipe, 5’ to
10‘ below
ground level
and below your
freeze line.
(You must determine
your freeze line)
This allows
the water in the ½”
pump handle pipe to
drain into the 1"
Thin Wall casing
pipe, then the 1”
casing pipe drains
out of the 1/4" weep
hole back into your
well.
Simple and 100%
Freeze Proof.
The pump handle and
above ground outer
casing pipe should
be removed when not
in use and your well
cap should be
properly insulated
against any
very extreme
cold
temperatures.
IMPORTANT: IN
EXTREME COLD TEMPS I
Recommend Putting 1"
Black FOAM
Insulation on the
last BELOW GROUND
section
of the larger 1"
Thin Wall outer
casing pipe. Wrap it
tightly with Black
Gorilla Tape so it
won't slide. Put the
insulation starting
from the bottom of
your well cap to at
least below your
freeze line.
|
|
![]() |
|
|
|
  |
|
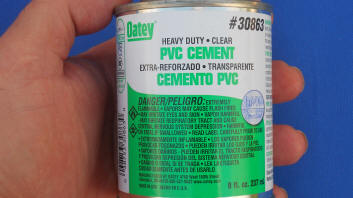
Get the medium
size (8 oz)
can of PVC
Cement...The large
can applicator is
too large
for our smaller
pipe. |
|
VERY,
VERY IMPORTANT:
Use
a cotton swab
(Q Tip)
when
applying cement to
the
INSIDE
of the 1/2"
couplers and 1"
couplers so you
don't apply too much
and restrict the
water flow.
Use the
can
applicator on
the
outside
of both 1/2" and 1"
pipe...The
Q Tip will give you
a good coating
on the inside
of couplers and then
the can
applicator, will
give you a
THICK COATING
on the outside
of both pipes.
Always give the
connections 1/4 turn
when cementing PVC
pipe together.
This helps the PVC
cement to be spread
evenly for a secure
fit. Be sure
to wipe away any
excess PVC cement
with paper towels
and discard
properly.
IMPORTANT...Too much
PVC Cement on the
inside
of the
1/2" couplers
could cause your
1/2"
pumping pipe
to be
blocked and your
hand pump will not
work properly, if
at all. |
|
|
|
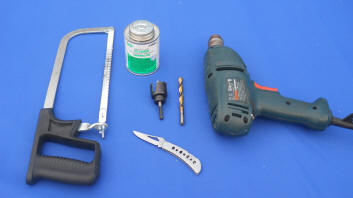
Let's Get Started:
You will need a
Hacksaw,
Knife, 1/4"
Drill Bit ,
1/16" Drill Bit
and
Heavy Duty Clear Medium Size Cans of
PVC Cement ...I
never use
primer...it's really
not needed for
smaller pipe |
|
|
|
IMPORTANT:
Average Handling/Set
Up Times for PVC/CPVC
Solvent Cements
Handling/Set Up Time
is the time required
prior to handling
the joint.
In damp or humid
weather, allow 50%
additional time |
Temperature
During
Assembly |
Pipe Diameter
1/2”
to 1" |
|
60° -100°F |
2 minutes -
I would wait
10 minutes
for each larger 1"
coupling fitting
cement to cure,
especially on deeper
wells. |
|
40° - 60°F |
5
minutes |
|
20° - 40°F |
8
minutes |
|
0° - 20°F |
10 minutes |
|
|
|
First,
You'll Need To
Determine Your
Static Water Level
Before Purchasing
Your Pipe and
Fittings.
It's IMPORTANT To
KNOW
Your Water Level
In Your Well Pipe
Before Proceeding
With Anything...
Don't Depend On Any
Paperwork Your Well
Driller Gave You
Years Ago...Your
Water Level May Have
Changed... You DON'T
Want To Install Your
New Pump And Be Just
Short Of
Water...It'll Only
Suck Air If That
Happens.
Measure It
Yourself...TWICE
You may have a 350'
well, but your
static water level
is much closer to
the surface.
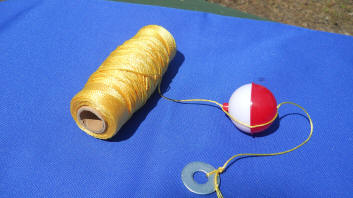
To find your static
well water level,
You'll need
a
fishing
bobber.
They are
normally red on
bottom & white
on top. (Wal
Mart, fishing
dept),
you'll need
a
large washer,
next get
some twine/string,
(not too thick)
say 100+
ft. Now
you are going
fishing...so to
speak. :-)
Tie the
washer to
the end of the
twine/string.
Next tie the
bobber about 6
inches to a
foot above the
weight. Now
lower
that down your
well
opening...the
bobber will
float when it
hits water and
go slack...you
should feel it
get lighter...(Make
Sure It Is
Hitting
Water...bob it
up and down
rather quickly ,
you should hear
a blooping sound
as the fishing
float hits the
water) then
pull it
tight to take
out the
slack...mark it
at top of well
opening
by pinching
a piece of tape
around the twine...pull
the
fishing bobber
out...lay
twine/string
on
the the
ground and
measure. That is
your static
water level.
|
|
 |
|
|
After Finding Your
Static Water Level.
If you have a 2"
well opening, I
recommend figuring
at 20' to 25' deeper
from your static
water level down to
the EZ pump piston
brass foot valve.
Here's why...The
recommended
20' to 25'
below static water
level is to give you
enough water in
your well
casing to pump up.
For example; My well
is 350' deep
and has a
static water level
of 37'...but it's
only a 2"
well casing.
So this allows me to
pump around 9 or so
strokes before I
draw down the water
to the foot valve
and it starts
sucking air. A 2"
well can only hold
so much water
at 27 feet below
static water level.
However, my water
recovery rate is
good. All I do is
wait less than a
minute and the water
level is back up and
I can start pumping
again.
This is
much less
critical in a 4" or
6" well because
they hold more water
in the well casing.
The 25' is NOT
written in stone.
With a 6" well, you
can put the foot
valve
15' below
static water
level...It's really
no big deal...Just
go as deep as you
can down to say 15'
to 25'.below static
water level. |
|
|
|
![]() |
|
|
|
Buying Your Pipe:
Our Pump Piston uses
1" THIN WALL PVC -
200 PE
Pipe At Lowes or
Home Depot,
for the outer
casing and 1/2" PVC
Schedule 40 for the
inner pumping pipe.
I recommend Lowes
if you have one near
you. Purchase in 10'
sections. The pump
piston cylinder is
around 3' long and
the handle section
is about 2' tall
above ground, so if
you are going down
about 70' all you
need is 7 -
10' pieces of
both pipe sizes...1"
Thin Wall and 1/2"
Schedule 40 PVC
pipe..
If you should need a
few more coupling
connectors, you'll
need 1" & 1/2"
couplers.
Let's lay out the
pump.. |
|
|
|
If Installing In a
Well/Pump House,
Basement Or Under
Any Roof,
See This Diagram
and Call Me With Any
Questions |
|
|
|
Cement one coupler
fitting to all 10'
sections of pipe on
the upper ends, both
1/2" and 1" pipes,
facing the pump
handle,
No Need For The
Primer...
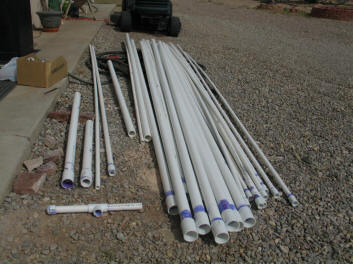 |
Photo of pipe and
Support Section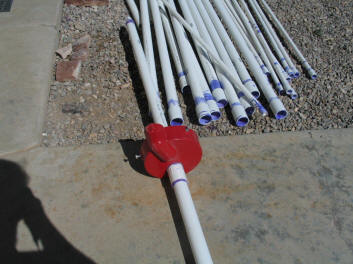 |
|
|
|
![]() |
|
Lay all piping out
so you can see how
it goes together and
to help keep you
organized
When laying out your
pump, start at the
bottom of the EZ
pump piston cylinder
and work your way up
to the pump
handle, as seen
in this photo. |
|
|
|
 |
VERY IMPORTANT:
Drill your 1/4"
Weep Hole and 1/16"
Anti Freeze Hole
while you have it
laid out on the
ground. See detailed
descriptions below. |
|
|
|
The All Important
1/4" Weep Hole Pipe
AND 1/16" AntiFreeze
Hole |
|
|
IN ADDITION
To The 1/4" Weep
Hole At Left, Drill
a 1/16" hole
ON ONE SIDE
of the last piece of
1/2" Pumping Pipe a
few feet below your
freeze line. This
will allow drainage
from the pumping
pipe as shown in the
above pump diagram. |
|
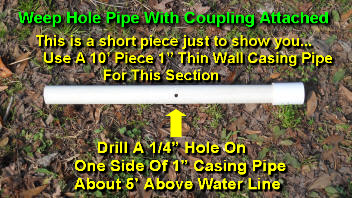
The pipe shown above
is a short piece for
illustration. Use
a 10' section.
|
|
|
|
Before attempting to
drill the holes, use
a small nail and tap
it with a hammer a
few times to make an
indentation in the
pipe, so the drill
bit won't slide
while you are trying
to drill the holes. |
|
|
|
Weep Hole Pipe:
See The Lay Out
Photo At The
Beginning:
Drill a 1/4"
hole ON ONE
SIDE in the
center of one 1" 10'
pipe. Put this pipe
between your static
water level and the
pump handle. The
hole should go about
5' or so above
your static water
level. The weep
hole is to drain any
seepage out of the
1" Thin Wall pump
casing back into
your well.
Then drill
the 1/16" antifreeze
hole a few feet
below your freeze
line. Be sure to get
any drill
shavings out of the
pipe. Push a rag
through the 1" pipe
with a 1/2" 10' pipe
to clean it out.
REMEMBER to include
both holes in the
assembly. VERY
IMPORTANT |
|
|
|
![]() |
|
|
|
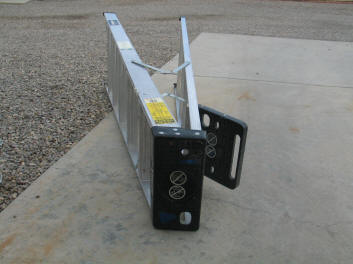
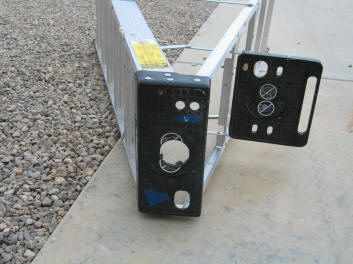
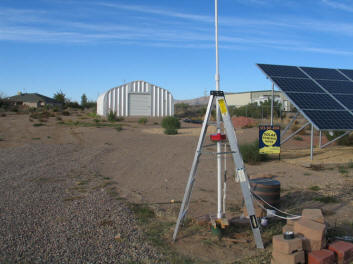
A ladder to assist
is optional - it
helps with a 1
person install. |
|
A ladder was
sometimes used when
installing the
heaver piping we
used in the past...I
left these photos in
for your
consideration...no
need to cut a hole
in your ladder...if
you use one,
stand the ladder
upright and simply
tie the pipe to the
side of the ladder
with a short piece
of rope. |
|
  |
|
|
|
When everything is
laid out: Let's get
started |
|
|
|
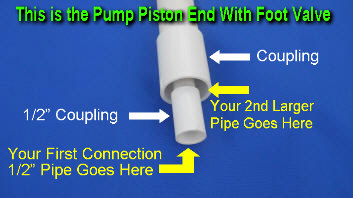
This Is The
Connecting End Of
The Pump Piston |
 |
|
|
|
To begin:
Cement the
first 10' section
of both size pipes
on the ground, then
insert 13' section
(3' Piston plus 10'
section) in well
pipe.
All other sections
will be
attached/cemented
vertically
|
|
|
|
![]() |
|
|
|
  |
|
|
|
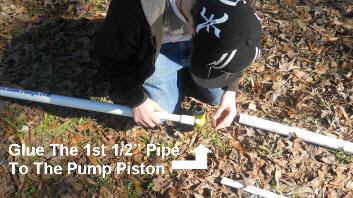
Begin Assembly:
Attach your first
pipe. Apply PVC
cement to the inside
of 1/2" coupling
that is already
attached to the EZ
piston cylinder
pipe. Then apply the
cement to the
outside of your
first smaller 1/2" X
10' pipe.
|
|
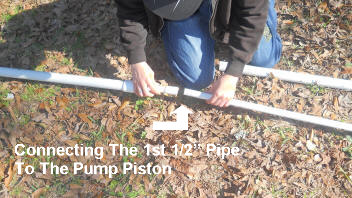
Connect the two by
pushing them
together tightly and
turning about
1/4 turn.
The turning helps
spread the cement
evenly. It's
important for a 1/4
turn on all
fittings. |
|
|
|
![]() |
|
|
|
Next,
your
first larger
pipe:
Take the 1" Thin
Wall X 10' casing
pipe and slide it
over the 1/2" pump
pipe. When the 1/2"
pipe is in the 1"
pipe, there is
little room for the
PVC cement
applicator to fit
into the 1" coupling
to swab with cement.
Simply try to
coat as best you can
the
inside lip
of the 1" coupling
without getting too
much glue on the
1/2" pumping pipe...(use
a cue tip cotton
swab bent a little
at a 45 degree
angle, it's smaller
than the can
applicator).
Then coat the
outside of the
1" casing pipe
thoroughly with
the PVC cement can
applicator
and connect to the
1" coupling on the EZ piston cylinder.
Push in hard
and make
1/4 turn.
Remember,
use
a cotton swab
when applying cement
to the
INSIDE of the 1/2"
couplers
so you don't apply
too much and
restrict the water
flow.
Use the can
applicator for
outside of both 1/2"
and 1" pipe...Apply
liberally on the
outside of both
pipes.
The PVC
cement must be
spread evenly for a
secure fit.
Take Your Time With
This. |
 |
|
|
|
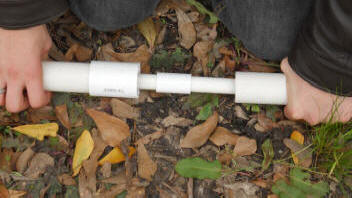
Now you have the
first 10' section of
piping cemented to
the 3' pump piston.
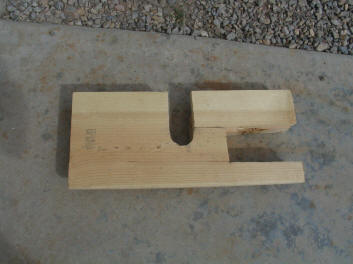
Install this
first assembled 13 '
section
into your well using
the wooden support
block. Then you add
10' sections
vertically as you
lower piping into
well.
|
 |
|
|
![]() |
|
|
|
Attach the next
vertical
section |
|
|
|
![]() |
|
|
|
The Channel Locks
are used in a 1
person install.
I recommend 2 people
for the install on
deeper wells with
more than 75' of
piping. As you add
pipe, you'll need
someone to move the
wooden support to
the next 1" coupling
as you lower the
piping
and to help with the
weight as you add
more pipe. |
Insert the 1/2" pipe
into the 1" pipe on
the ground and clamp
on the channel locks
(IF A ONE PERSON
INSTALL)
as seen to left.
Then raise to
vertical position
and cement the 1/2"
pipe. Then remove
channel locks and
cement the larger 1"
pipe.
Be sure to cement
the inside and
outside of all pipe
casing.
Remember , TAKE
YOUR TIME AND THINK
EVERYTHING THROUGH.
The red handle clamp
is optional
and is simply used
to hold the 1/2"
pipe a little higher
while cementing. OR
another person
helping can hold up
the pipe while you
glue/cement.
Also optional
but recommended
is a nylon or
polypropylene rope
tied securely to the
pump piston just
under the larger 1"
coupler and anchored
to a ladder or
stationary object,
as seen to left as a
safety line. After
install, simply tie
off around the lower
well pipe and leave
in place.
Let the PVC cement
cure (dry) for
at least 10
minutes
before lowering each
10' section into
your well. |
|
|
|
Simply
repeat the process
all the way up To
The Top T Handle.
 |
|
![]() |
|
|
|
|
|
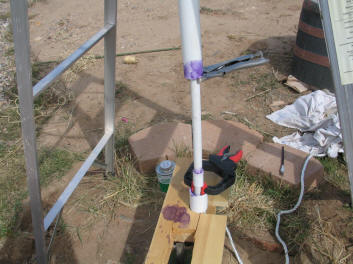
This photo shows
completed pump...before
channel locks were
removed and "T"
handle is pushed
down.
 |
|
|
|
![]() |
|
|
|
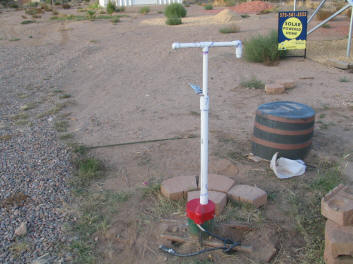
Pumping:
The pump stroke
should not
be fast and jerky.
The most efficient
way to pump is a
smooth straight
up stroke then
push straight down
smoothly then pull
straight up
smoothly. |
|
|
|
You are finished,
Done...Pat yourself
on the back, you
deserve it.
Now a sincere
personal note. This
may sound hokey, but
the very first water
that comes out of
your hand pump will
give you a feeling
of self reliance and
security, knowing
you have prepared
for your family one
of the most
important things for
survival...water.
It's a great
feeling. |
|
|
|
We
Offer Great Support:
If You Need Help
Installing Your E-Z
Water Well Hand
Pump, Call
1-409-554-3628
9am to 5pm, Mon to
Sat
After hours
Email Our Help Desk.
WE ARE
THERE FOR YOU AT
EVERY STEP. |
|
|
|
|
|
|